The Stack Part 1: Setting up your AWS Account Structure

In the last post we went over the overall goals of "The Stack" and what we will be building. In this post we'll be setting up our AWS Account structure. See the full overview of posts here.
As a reminder, here is the structure we are aiming for:
- Control Tower: This is your central place to control access and policies for all accounts in your organization
- Production Multi-tenant: Your primary production account for multi-tenant setup, and most likely were the majority of users will be
- Production Single-tenant: While desirable to avoid the operation overhead for single-tenant setups, its good to think in this from the get-go
- Integration Test: This will be the account that IaC deployments get tested on to ensure rollout works
- Preview: This will be used to spin up Preview Environments later on
- Individual Developer: Individual developer accounts to allow easy testing of IaC testing and exploration
- Monitoring: Centralize monitoring and observability into one account, allowing access to insights without access to sensitive logs or infrastructure from the other accounts
- Logs: Centralized storage of logs, which may require different access considerations than metrics and traces
Or, for the visual learners:
graph TD
  subgraph ControlTower[AWS: Control Tower]
    AuditLog[Audit Log]
    GuardRails[Guard Rails]
  end
  ControlTower-->AWSProdMultiTenantAccount
  ControlTower-->AWSProdSingleTenantAccount
  ControlTower-->AWSIntegrationTestAccount
  ControlTower-->AWSPreviewAccount
  ControlTower-->AWSIndividualDeveloperAccount
  ControlTower-->AWSMonitoringAccount
  ControlTower-->AWSLogsAccount

  subgraph AWSProdMultiTenantAccount[AWS: Production Multi-tenant]
    AccountFillerProdMultiTenant[...]
  end

  subgraph AWSProdSingleTenantAccount[AWS: Production Single-tenant]
    AccountFillerProdSingleTenant[...]
  end

  subgraph AWSIntegrationTestAccount[AWS: Integration Test]
    AccountFillerIntegrationTest[...]
  end

  subgraph AWSPreviewAccount[AWS: Preview]
    AccountFillerPreview[...]
  end

  subgraph AWSIndividualDeveloperAccount[AWS: Individual Developer]
    AccountFillerIndividualDeveloper[...]
  end

  subgraph AWSMonitoringAccount[AWS: Monitoring]
    direction LR
    CloudWatchDashboards[CloudWatch Dashboards]
    CloudWatchMetrics[CloudWatch Metrics/Alarms]
    XRay[XRay Analytics]
  end

  subgraph AWSLogsAccount[AWS: Logs]
    CloudWatchLogs[CloudWatch Logs]
  end

  classDef container stroke:#333,stroke-width:2px,fill:transparent,padding:8px
  class ControlTower,AWSProdMultiTenantAccount,AWSProdSingleTenantAccount,AWSIntegrationTestAccount,AWSPreviewAccount,AWSIndividualDeveloperAccount,AWSMonitoringAccount,AWSLogsAccount container;
Let's jump into it!
Set up Control Tower
AWS has an excellent Getting Started Guide which goes through setting up a new Control Tower at a high-level. We'll do a few adjustments to the defaults to make it fit our needs.
Fist off, you will need an existing AWS Account. This is the one we are turning into our Control Tower, or also called our "Landing Zone". If you don't already have an account ready to use, then go setup your AWS Account first.
Now that we are ready, a high-level overview of the steps we will be taking are:
- Sign in to the AWS management console with your root user.
- Navigate to the "Control Tower" console here.
- Change to the region you want your base to be in (e.g. for me I prefer eu-west-1).
- Click "Set up landing zone" to start the process.
- Set up your landing zone, following the detailed steps below
Step 1
The first screen you'll meet wants you to review various infomration and pricing as well as choose a few defaults. We are going to change some of the values:
- Region deny setting: Choose
Enabledfor this. We want to make sure that Control Tower is governing our accounts and resources. - We will need
us-east-1for certain "global" resources, so we'll add that to the list of allowed regions along with your desired region.
Step 2
Now we need to create our Organizational Units (OUs). We want both a Foundation and an Additional OU, but we will rename them a bit to make more sense for our use-case:
- Foundation OU: We'll call this
Compliancesince it contains our Logs as well as our Audit accounts. - Additonal OU: This is where we will put our Production workloads into, so we'll call this
Production.
Step 3
The Foundation OU, Compliance, creates two accounts for us. We to set up emails for these accounts, but we will keep the names. I recommend pointing this to an administrator email and using + to allow the same email to be used for multiple accounts:
- Log Archive:
[email protected](adjust to an account and domain you control) - Audit:
[email protected](adjust to an account and domain you control)
Step 4
Now that we have a location for our logs, we can configure CloudTrail as well as log retention. You can adjust to your needs, but I recommend the following:
- CloudTrail:
Enabled - Amazon S3 bucket retention for logging:
1 years - Amazon S3 bucket retention for access logging:
10 years - KMS Encryption:
Enable and custome encryption settings
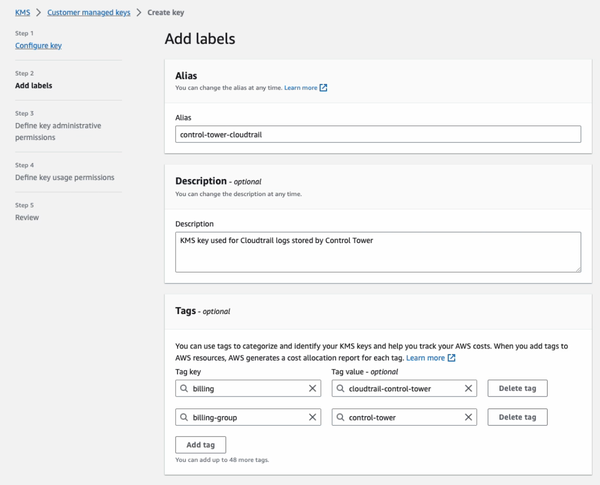
When you check the box to enable KMS encryption you'll be asked for a key to use. Click "Create a KMS key" which will take us into the KMS Console:
Key configuration
- Symmetric
- Encrypt and decrypt
Key labels
- KMS Key Alias:
control-tower-cloudtrail - Description:
KMS key used for CloudTrail logs stored by Control Tower - Tags:
- Key:
billing, Value:cloudtrail-control-tower - Key:
billing-group, Value:control-tower
- Key:
We'll immediately start our good habit of adding billing tags whereever we can, which greatly simplifies diving into cloud expenses.
Skip through Step 3, Step 4, and click "Finish" on the review step.
Once the key is created we'll immediately edit it now that it has gotten a Key ID. If we don't we'll run into this nice error later on:
To avoid this:
- Click on your newly created key.
- Note down the Key ID (e.g.
12345678-1234-1234-1234-123456789012). - Note down your AWS Account ID (e.g.
123456789012). - Click "Edit" and switch to the JSON policy editor.
- Add the following policies, with values replaced, at the end of the
Statementlist.
Replace AWS_REGION, AWS_ACCOUNT_ID, and KMS_KEY_ID and insert the following:
1 2 3 4 5 6 7 8 9 10 11 12 ,
13 14 15 16 17 18 19 20 21 22 23 24 25 26 27 28 29 30 31 32
This ensures that both Config and CloudTrail can use the key for encryption and decryption.
Step 5
Review and confirm the setup.
Cleanup
Finally, we'll also cleanup the VPCs that were created in our Control Tower:
- Go to the AWS Console -> VPC.
- Click on Your VPCs in the menu on the left, and click on your Control Tower VPC.
- Choose Actions and then choose Delete VPC as well as confirming the choice.
Adjusting Account Factory defaults
By default the Account Factory will be creating VPCs and Subnets in newly provisioned accounts. We don't want this as we are focusing on serverless, so we'll disable this.
- Go to the AWS Console -> Control Tower.
- Go into Account Factory.
- Click Edit on the Network configuration card.
- Set the Maximum number of private subnets to
0 - Uncheck any checkboxes in the Regions for VPC creation list.
- Click Save.
Set up our Development Organizational Unit
We've only set up two OUs so far, Compliance and Production, but we have one more we'd like to use. Jump into your Organization overview in Control Tower:
- Go to the AWS Console -> Control Tower.
- Go into Organization.
- Click Create resources and choose Create organizational unit.
- Call it
Developmentand set the Parent OU toRoot.
This will take a bit of time, and we cannot create accounts during this.
Set up our AWS Accounts
For this step it's important that you are not logged in as the Root user anymore. Instead, jump to your new User portal URL which AWS has set up for us.
Find the User portal URL:
- Go to the AWS Console -> Control Tower.
- Go into Users and access.
- Copy the User portal URL from the Federated access management card.
- Bookmark this URL, you're gonna need it a lot.
Once you're logged into the Control Tower account using the portal, jump into the Account Factory again:
- Go to the AWS Console -> Control Tower.
- Go into Account Factory.
- Click Create account.
We'll be creating the following accounts:
Integration Testin our Development OUPreviewin our Development OUProduction Multi-tenantin our Production OUProduction Single-tenantin our Production OUMonitoringin our Production OULogsin our Production OU
For each account, in the Create account process, fill in:
- Account email: An unused email for the account, e.g.
[email protected] - Display name: The name of the account, e.g.
Integration Test - IAM Identity Center user email: The email of the user that will be the administrator of the account, e.g.
[email protected] - IAM Identity Center user first name: The first name of the user that will be the administrator of the account, e.g.
Integration - IAM Identity Center user last name: The last name of the user that will be the administrator of the account, e.g.
Test
Pick the appropriate Organizational unit according to the list above, and click Create account.
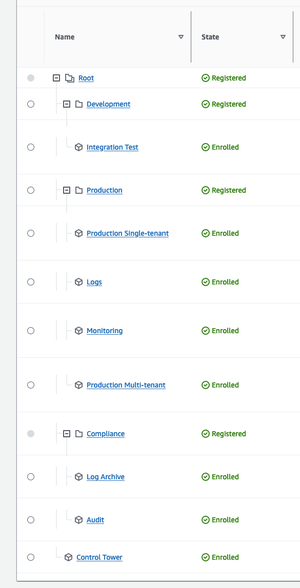
You should end up with an overall structure like the following (Preview environment missing, but should be in the Development OU):
Next Steps
Next up, we will be looking at how we can set up and automate our deployments to these environments so that once we start building it will update automatically. Follow along in Part 2 of the series.


